Grafisociety News

My name blog with Newspaper Font, I choose it for all visitor always remember my blog name *Grand Launching 31-Mei-2013*

USB Cable

USB Cable design also made for visitor always remember my blog tutorial design.

Great Book

Great Book one name of the few design, I always give name for my design and this one of them .

Showing posts with label Tutorial Illustrator. Show all posts

"Create Delicious Krabby Patty"

TH3 GRAFISOCIETY


Finished hamburger icon

The Bottom Bun

Create a new document in Illustrator and set the canvas to 72×72 pixels. This icon size is used for Android launcher icons. I won’t go into the details of pixel-perfect icon creation, preventing blurry lines etc. That’s for another tutorial.
You should make a sketch every time you design anything to block out the shape and the colors and check out the perspective. I did my sketch directly in Illustrator, painting with the Blob Brush using a tablet. I cannot recommend a tablet enough so start saving today…Burger icon sketch
Zoom in until the canvas fills the screen and draw the shape for the bottom bun (1a), filling it with the proper gradient (1b).
Add some Inner Glow from the Effect menu (1c) to make the bun appear round.
Draw the bottom bun
Draw the inside of the bun (2a) and fill it with a lighter gradient (2b). SInce it falls out of the bottom shape we need to crop it. Duplicate the bottom shape and place it above the inside (2c). Now select both shapes and hit Cmd+7 to create a clipping mask: now the inside is cropped to the bottom (2d).
We’ll use this technique every time an object needs to be cropped to another so keep referring to this step.
Draw the inside of the bun

The Filling

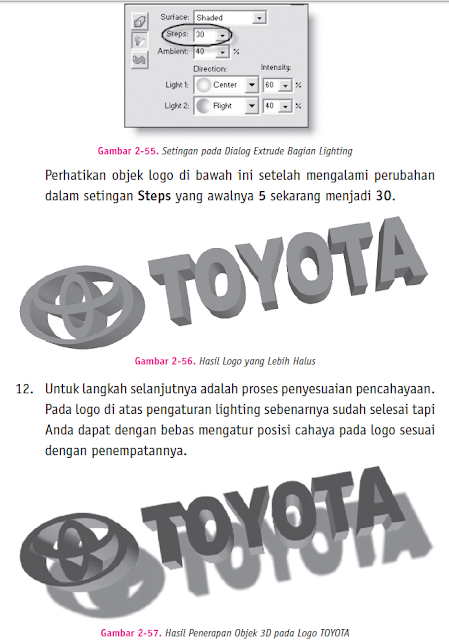
The first item to add is a leaf of lettuce (3a) filled with a strong green gradient (3b).Draw the lettuce
Add the patty (4a) and select a meaty gradient, burnt to a crisp (4b).Draw the meat patty
Add a slice of tomato on top of the patty (5a) using the proper colors (5b). As you can see we don’t waste time drawing the texture of the meat or the inside of the tomato because these details won’t be visible at the final size, they’ll only add visual noise.Draw the tomato slice
The fillings cast a shadow onto the bottom bun so duplicate the lettuce and make it black. Set it to Multiply and lower the Opacity to 35% (6a). Go to Effect > Blur > Gaussian Blur and choose the appropriate settings (6b).Draw the lettuce shadow
As you can see the shadow bleeds out from the bun’s outline (7a) so we need to crop it with a clipping mask (see previous step) (7b).Crop the shadow to the bun
Let’s also add a drop shadow below the bun, this is not a flying burger. The shadow is a black ellipse set to Multiply with an Opacity of approximately 50% and a good dose of Gaussian Blur added to it. I guess you now know how to create shadows!Draw a drop shadow below the bun
Wait a minute, no cheese? Of course! Draw a squarish shape but make it droop at the corners like a good slice of semi-melted cheese does (8a). Check out the cheesy gradient (8b)! Duplicate this shape and move it up (8c). Make it lighter, modifying the color stops in the gradient (8d).Draw the slice of cheese
All we need to do now is draw the shadow cast by the cheese on the tomato and the filling is complete.Draw he shadow cast by the cheese

The Top Bun

Mmh, the hamburger is almost complete.
Draw the top bun much like you drew the bottom bun (9a, 9b).
Draw the top bun
Create a smaller shape to act as top highlight and set it to Screen and 85% Opacity (10a). Add some Gaussian Blur to smooth its edges (10b) then use the clipping mask method to crop it to the bun (10c).Draw the top highlight

Finishing Touches

Let’s not forget the top bun casts a shadow onto the cheese so just like before add your blurry shadow (11a). Finally draw a bunch of small, light yellow ellipses on top of the bun: the unrenounceable sesame seeds (11b).Add the finishing touches

(Source: cutelittlefactory) 
visit: grafisociety.blogspot.com

"Create A Mini Vintage TV"

"TH3 GRAFISOCIETY"

final

Step 1: Creating the front

Open a blank new document and create a brown rectangle:
01-rectangle
Make a copy of it and paste it in front, scaling it down. Fill it with a soft radial gradient:
02-gradient
Now select Effects > Stylize > Inner Glow and use these settings:
03-inner-glow
Now select both rectangles, hit Ctrl+C then Ctrl+F to copy them and paste the copies in front. Hide the first two rectangles to avoid selecting them. With both new rectangles selected go to the Pathfinder palette (to show it hit Shift+Ctrl+F9) and click on Minus Front (second icon from the left, top row):
04-minus-front
Select the frame thus created and add a Drop Shadow from Effect > Stylize. Also use the first rectangle we created as a clipping mask for the frame, so the drop shadow is only visible on the inside:
05-drop-shadow-and-clipping-mask

Step 2: Finishing the case

Our icon is shown in frontal perspective so draw a trapezoidal shape to represent the set’s depth:
06-depth
Draw light yellow lines across the top and bottom edges, applying a tapered calligraphic brush. Set the Blending Mode to Overlay and Opacity to 70%:
07-lines-across-edges
Add an Outer Glow effect to both lines:
08-outer-glow

Step 3: Drawing the control panel

Draw a gold yellow rectangle and add a left Drop Shadow:
09-draw-panel-add-drop-shadow
Next create an irregular shape like in the next image:
10-draw-irregular-shape
Make a copy of the panel, remove the drop shadow then subtract the irregular shape from it. Reduce the Opacity to 40% and choose the Screen blending mode. The panel now has a reflection:
11-screen

Step 4: Creating the screen

Draw a rectangle and add a gray-green radial gradient:
12-draw-screen
Go to Effect > Stylize > Round Corners:
13-round-corners
Go to Object > Expand then add a 3px white stroke, aligned with the outside:
14-expand-add-stroke
Expand again and ungroup the object. Select the white outline, give it a soft vertical gradient from light gray to white, then add an Outer Glow effect:
15-expand-then-outer-glow

Step 5: Adding reflections to the screen

Draw a white ellipse on top of the screen. Move it up so it roughly covers its top half. Clip it with a copy of the screen. Set it to Soft Light, 65% Opacity:
16-add-big-reflection
Let’s add a couple of blurry highlights. Draw a white circle on the top right corner of the screen, go to Effect > Blur > Gaussian Blur and choose a high value. Then copy it to the bottom left corner, squash it vertically, rotate it about 45 degrees. Set both highlights to Overlay mode and play with the opacity until you find a suitable value:
17-add-blurred-highlights

Step 6: Adding a wood texture to the top

On a new layer draw some horizontal fiber-like shapes. Give them a brown fill darker than the top of the TV set. If necessary duplicate them. Reduce their opacity to 50%:
18-wood-texture
Squash the fibers vertically to fit them over the top of the TV then use a copy of the top panel as a clipping mask:
19-squash-vertically-then-clipping-mask
To finish off the top let’s add a reflection. Draw a wedge shape on top of the fibers, set it to Screen mode and reduce its opacity to 25%:
20-add-top-reflection

Step 7: Creating the legs

Our TV sits on two short legs. Start with two ellipses placed on top of each other, slightly apart. With the Direct Selection Tool (A) select the top anchor points and delete them. Finally connect the two curves with vertical lines:
21-draw-legs
Place the leg beneath the case and add a golden gradient. To simulate the shadow cast by the TV box, copy the leg and paste it in front. Give it a vertical, dark brown-to-transparent gradient and set it to Multiply, the standard blending mode for shadows. Group the two objects and duplicate them to the other side. The legs are done:
22-shade-leg

Step 8: Creating the knobs

Old TVs have two knobs: one for turning it on and off and setting the volume, one for selecting the channel. Let’s create two knobs with simple circles.
Draw a circle on a new layer, on top of the control panel. Add a gray radial gradient to simulate metal:
23-draw-knob
All knobs must be shiny! Draw two symmetrical triangles and group them. Make a copy of the circle, making sure it’s placed under the triangles in the layer stack. Now subtract from it the triangles with the Minus Front command explained before. Apply a solid white fill to the resulting shape and add a 10px Gaussian Blur effect:
24-add-shiny-reflections
To complete the knob make a couple of copies of the bottom circle, scaling them down and adjusting the gradients. Add a drop shadow to the bottom circle. Group all objects and place a copy below. Don’t you love things with two knobs on them?
25-complete-knobs

Step 9: Creating the speaker grille

What would a vintage TV set be without crackling sounds coming from a dingy speaker grille?
On a new layer draw a pale yellow rectangle directly below the knobs. Go to Effect > Stylize > Round Corners and choose the value that best suits your design:
26-create-grille-plate
Now let’s precision-drill a bunch of holes in the grille plate.
Start by drawing a dark brown circle smack in the top left corner. Copy it over to the other corner. Select both circles and make a blend with 4 steps. Go to Object > Expand to turn the blend into a regular group. Copy it to the bottom of the plate. With both groups selected make another blend, this time specify 6 steps. Expand again and the grill is done:
27-create-holes

Step 10: Finishing touches

The TV set is just about done. Just add a shadow below it to make it sit better, maybe a bit of depth to the speaker grille and of course personalize the screen with your custom graphics. I put my logo in with some cool lines. Isn’t it a perfect icon for your website?
final

(Sumber: cutelittlefactor)
visit: grafisociety.blogspot.com

"Membuat Logo 3D Toyota"
TH3 GRAFISOCIETY


(Sumber: ebook Desain 3D)